Home Window Installation: Master 4 Easy Steps
Why Home Window Installation is Your Gateway to Better Living
Home window installation is one of the quickest ways to boost comfort, cut energy costs, and freshen your home’s look. Modern windows do far more than let in light—they actively work to keep interior temperatures stable and outside noise and UV rays at bay.
Top benefits at a glance:
- Energy savings – Many homeowners see up to 25 % lower heating and cooling bills.
- Higher property value – Updated windows are a strong selling point.
- Year-round comfort – Tighter seals stop drafts and hot spots.
- Improved security – Stronger glass and robust locks deter break-ins.
- Noise control & UV protection – Double or triple panes dampen sound, Low-E coatings cut fading.
Installation falls into two main categories:
- Insert replacement – New units slip into sound existing frames.
- Full-frame replacement – Everything is removed to the rough opening and rebuilt.
Expect to invest $800–$4,000 per window for quality product and pro labor. Standard professional installs run 1–2 hours per unit, while a first-time DIYer should plan on 4–6 hours at ground level.
Over more than a decade with Colorado Preferred Roofing I’ve overseen projects ranging from single pocket replacements to whole-house makeovers. One lesson never changes: precise installation is what makes good windows great.
Before You Begin: Is It Time for a Window Upgrade?
Not every window needs immediate replacement, but some signs are hard to ignore. After years of working with Colorado homeowners, I’ve learned to spot the telltale indicators that it’s time for a home window installation project.
Drafts are probably the most obvious red flag. If you can feel cold air sneaking through your windows during those chilly Colorado winters, or if your curtains mysteriously flutter when there’s no breeze inside, your windows aren’t doing their job anymore. It’s like having a hole in your jacket – you’ll notice it immediately.
Condensation between glass panes is another dead giveaway. When you see moisture trapped between double or triple-pane windows, the seal has failed. This doesn’t just look bad – it means you’ve lost all the insulating benefits that made those windows energy-efficient in the first place.
Water stains around window frames should set off alarm bells. In Colorado’s variable climate, moisture infiltration can quickly lead to rot, mold, and even structural damage. I’ve seen too many homeowners ignore small water stains only to find major problems later.
Rotting or deteriorating frames are particularly common in older wood windows. Here’s a simple test: if you can easily push a screwdriver into the frame, it’s definitely time for replacement. The wood has lost its structural integrity.
Your energy bills tell their own story. When windows fail, your HVAC system works overtime to maintain comfortable temperatures. If you’ve noticed your heating and cooling costs creeping up, failing windows might be the culprit.
Difficult operation is more than just annoying – it’s a safety issue. Windows that stick, won’t stay open, or require significant force to operate have worn-out mechanisms that won’t get better with time.
Faded furnishings near windows indicate poor UV protection. If your furniture, carpets, or artwork are noticeably faded where sunlight hits them, your windows aren’t blocking harmful rays effectively. This also means they’re not providing optimal energy efficiency.
Poor sound insulation becomes obvious when you can clearly hear traffic, neighbors, or other outside noise through closed windows. Quality windows should provide a peaceful indoor environment.
Beyond these functional issues, improving curb appeal and increasing property value are compelling reasons for window replacement. New windows can dramatically transform your home’s appearance while providing excellent return on investment – something every homeowner appreciates.
The Big Decision: DIY vs. Hiring a Professional
Here’s the truth: window replacement looks simple, but accuracy and safety are everything. Compare your choices below.
| Factor | DIY Installation | Professional Installation |
|---|---|---|
| Cost | $300–$600 (materials) | $800–$4,000 (turn-key) |
| Time | 4–6 h per window | 1–2 h per window |
| Skill | Moderate–advanced | None required |
| Tools | Buy/rent | Provided |
| Warranty | Product only | Product + labor |
| Risk | High (leaks, injury) | Low (insured crew) |
Should You DIY?
Ask yourself:
- Have you measured, shimmed, and leveled doors or windows before?
- Will you be comfortable lifting heavy glass on a ladder?
- Can you dedicate several full weekends if surprises pop up?
If you answered “no” to any of these, pro installation is probably the better value.
Costs & Timelines in Colorado
Vinyl insert windows often land close to $800 each installed. Premium wood or fiberglass, custom sizes, or full-frame work raise the price. Pros can complete an average house (10 windows) in about two days, bays or bows in one long day apiece.
Picking a Quality Installer
- Confirm license, insurance, and Colorado Roofing Association membership.
- Read reviews on multiple sites—note cleanup and follow-up service.
- Get at least two written quotes with product specs, timeline, and labor warranty.
- Choose firms that background-check and factory-train their crews.
Watch installation examples to see how the pros make it look easy and decide if you’re up for the challenge.
Gearing Up: Tools, Materials, and Window Types

There’s nothing worse than getting halfway through a home window installation project only to find you’re missing a crucial tool or material. Trust me, I’ve seen plenty of DIY enthusiasts make multiple trips to the hardware store because they didn’t prepare properly. Preparation is key to a successful installation, and having everything ready before you start will save you time, frustration, and potentially costly mistakes.
Your Essential Toolkit and Materials
Getting your tools organized ahead of time makes the entire installation process smoother. You’ll need safety glasses and work gloves first and foremost – window installation involves sharp edges and flying debris. Your tape measure should be at least 25 feet long, and a sturdy 2-foot level is essential for ensuring your windows are perfectly straight.
For the actual installation work, grab a caulk gun and utility knife with sharp blades. A pry bar helps remove old windows without damaging surrounding materials, while your power drill with various bits handles the fastening. Composite shims are preferred over wood because they won’t compress over time, and you’ll need a hammer, screwdriver set, and putty knife for finishing touches.
The materials list is equally important. Your replacement window needs to be properly sized (we’ll cover measuring techniques later), along with flashing tape and exterior-grade sealant for weatherproofing. Low-expansion spray foam designed specifically for windows and doors prevents the frame from warping, while backer rod weatherstripping creates proper sealing depth.
Two game-changing tools that pros swear by are a speed or rafter square for checking angles quickly and an Air Shim for making precise adjustments during installation. These aren’t absolutely necessary, but they’ll make your life much easier.
Choosing Your Replacement Windows
Selecting the right windows feels overwhelming with so many options available. Double-hung windows remain the most popular choice because they’re traditional, versatile, and work well in most homes. Casement windows swing outward and provide maximum ventilation – they’re perfect for areas where you need to reach outside to open them, like above kitchen sinks.
Sliding windows are ideal when you can’t have windows swinging into walkways or patios. Awning windows hinge at the top and are fantastic because you can leave them open during light rain for ventilation. If you want to make a statement, bay and bow windows add both interior space and dramatic curb appeal, though they’re significantly more complex to install. Picture windows maximize views and natural light but don’t open.
When it comes to frame materials, vinyl dominates the market for good reason – it’s low-maintenance, energy-efficient, and affordable. Wood frames offer classic beauty but require regular painting and maintenance to prevent rot. Fiberglass provides excellent strength and energy efficiency with minimal upkeep, though it costs more upfront. Aluminum-clad windows give you wood interiors with durable aluminum exteriors.
The biggest decision you’ll face is insert vs. full-frame replacement. Insert replacement works when your existing frames are solid and square – the new window fits inside the old frame. Full-frame replacement removes everything down to the rough opening and is necessary when frames are damaged or you want to change the window size. Insert replacement is definitely more DIY-friendly for most homeowners.
The Ultimate Guide to Home Window Installation
Below is a streamlined overview of the process so you know what to expect (or what to replicate) without drowning in unnecessary detail.
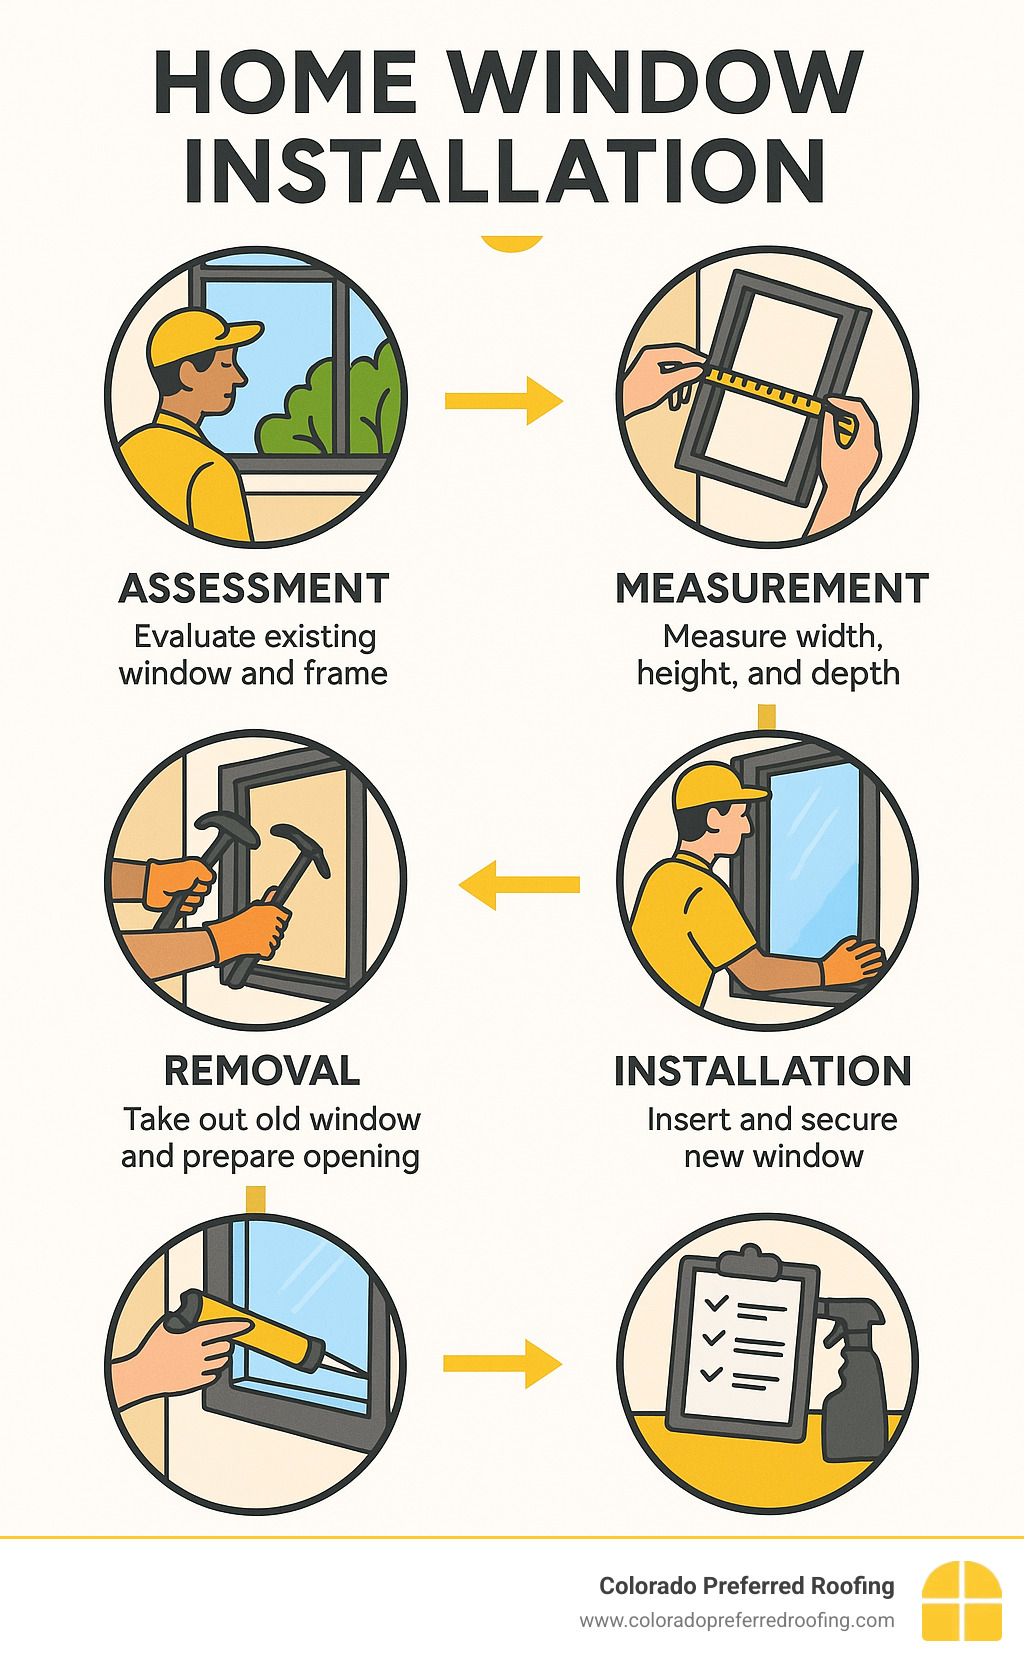
Step 1: Prepare & Measure
Clear furniture, remove blinds, and lay drop cloths. Measure width and height in three places, recording the smallest dimension. Check diagonals; more than 1/4 in. out-of-square often calls for a full-frame replacement.
Step 2: Remove the Old Window

Score paint, pry off interior stops, and lift out the sashes. Watch for lead paint in pre-1978 homes and dispose of debris safely. Vacuum the opening and repair soft or damaged areas before you continue.
Step 3: Install the New Window

- Dry-fit to confirm clearance (about 1/4 in. gap all around).
- Level the sill with composite shims and secure.
- Apply flashing tape on the sill, 6 in. up each jamb.
- Run a continuous 3/8-in. bead of exterior sealant on the top and sides (leave small corner gaps for drainage).
- Set window, center it, then check plumb, level, and square.
- Shim at factory screw holes; fasten lightly, re-check operation, then snug all screws.
Step 4: Seal & Insulate
Apply low-expansion foam between frame and framing—go easy. After curing, trim excess foam and insert backer rod where needed. Caulk exterior joints, working shingle-style with flashing and housewrap so any water that sneaks in can still get out.
That’s it! When each window opens easily and no daylight shows around the frame, you’re ready for finishing touches.
Finishing Touches and Post-Installation Care
Trim, Caulk, and Clean
Re-install interior stops, fill nail holes, and run a smooth bead of paintable latex caulk. Touch-up paint or stain once the caulk dries. Finish by wiping the glass, vacuuming the work zone, and cycling each sash to confirm easy operation.
Responsible Window Disposal
- Recycle the aluminum or vinyl parts if your local center accepts them.
- Donate usable wood windows to architectural salvage.
- Upcycle into décor such as picture frames or garden cold frames.
Simple Maintenance Checklist
- Inspect glass, seals, and caulk every spring and fall.
- Clean tracks; vacuum out debris.
- Lubricate locks and hinges with a non-petroleum spray.
- Replace worn weather-stripping promptly.

Frequently Asked Questions about Home Window Installation
Do I need a permit to replace my windows?
This is one of the most common questions we hear from homeowners considering home window installation. The good news is that permit requirements vary by location, and in most areas including Colorado, you typically don’t need a permit for simple window replacement.
When you’re replacing windows in existing openings with similar-sized windows, most municipalities treat this as routine maintenance rather than new construction. However, new openings or structural changes require permits from your local building department – this includes making windows larger, adding new windows, or removing structural elements.
The key is to always check with your local building department in Littleton, CO, or your respective municipality before beginning work. Some areas have specific requirements for energy efficiency standards or historic districts that may affect your project. It’s much easier to get clarity upfront than to deal with complications later.
Can windows be installed in cold weather?
Absolutely! Professional installation is a year-round service here in Colorado. We understand that window emergencies don’t wait for perfect weather, and neither should planned replacements.
Installers work on one window at a time to minimize heat loss during installation. This approach keeps your home comfortable while ensuring each window gets the attention it deserves. You won’t have to worry about your house turning into an icebox while work is being done.
The secret is that professionals use specialized cold-weather sealants that cure properly in low temperatures. These products are specifically designed to bond effectively even when it’s chilly outside, ensuring a proper seal and long-term performance. Regular sealants might not cure correctly in cold weather, but the right products make winter installation completely feasible.
Are there government rebates for new windows?
Energy efficiency rebates are often available through various programs, making home window installation more affordable than you might think. The rebate landscape changes regularly, so it’s worth doing some research before you buy.
Start by checking federal programs like ENERGY STAR for current rebate offerings and qualifying window specifications. These programs typically require windows to meet specific energy efficiency standards, but the savings can be substantial.
Don’t forget to search for state and local utility company incentives that may provide additional savings. Many Colorado utilities offer rebates for energy-efficient upgrades including windows. These local programs often stack with federal incentives, maximizing your savings.
Programs like the Canada Greener Homes Grant provide examples of what’s possible – they offer up to $40,000 for qualifying improvements. While this specific program is for Canadian homeowners, similar programs may be available in your area. The key is to research thoroughly and apply for rebates before starting your project, as many programs require pre-approval.
Conclusion
You’ve made it through the complete home window installation journey, and I hope you’re feeling confident about tackling this transformative home improvement project. Whether you’re rolling up your sleeves for a DIY trip or calling in the pros, you now have the knowledge to ensure your new windows perform beautifully for years to come.
Here’s the thing about window installation – proper installation is absolutely crucial for performance. I’ve seen too many homeowners purchase premium windows only to have them fail because corners were cut during installation. Even the most expensive, energy-efficient windows will leak air, allow water infiltration, and operate poorly if they’re not installed with precision and care.
The techniques we’ve covered aren’t just suggestions – they’re the foundation of a successful installation. From measuring at three points and using the smallest dimension, to applying flashing tape shingle-style and using low-expansion foam sparingly, each step builds on the last to create a weatherproof, energy-efficient barrier.
The DIY versus professional decision really comes down to honest self-assessment. If you have solid carpentry skills, the right tools, and plenty of time, DIY installation can be rewarding and cost-effective. But remember, you’re working with heavy materials, often at heights, and mistakes can be expensive to fix.
For most homeowners, especially those dealing with full-frame replacement or complex window configurations, professional installation offers peace of mind that’s worth the investment. When you factor in the time saved, warranty protection, and reduced risk of costly mistakes, professional installation often makes financial sense.
At Colorado Preferred Roofing, we understand that your home’s exterior envelope – including both roofing and windows – works as an integrated system. Our experience with Colorado’s unique weather challenges, from intense UV exposure to sudden temperature swings, means we know how to install windows that will stand up to everything our climate throws at them.
Whether you’re in Littleton, Denver, or anywhere across Colorado, proper installation protects your investment and keeps your family comfortable year-round. Learn more about our expert installation services and find how our commitment to quality craftsmanship can improve your home’s performance and value.
Your new windows represent more than just a home improvement – they’re an investment in comfort, energy efficiency, and your family’s quality of life. With the right approach and attention to detail, your home window installation project will deliver benefits you’ll enjoy for decades to come.