How to Repair Flat Roof Membrane: 4 Stress-Free Steps
Understanding the Importance of Flat Roof Membrane Repair
Learning how to repair flat roof membrane is crucial for protecting your Colorado property from water damage, structural issues, and costly replacements. Whether you’re dealing with a small tear or ponding water, understanding the repair process can save you hundreds of dollars and prevent minor issues from becoming major headaches.
Quick Answer for Flat Roof Membrane Repair:
- Identify the leak – Look for water stains inside, then locate the source on the roof
- Clean and prepare – Remove debris and dry the damaged area completely
- Apply primer – Use membrane-specific primer for proper adhesion
- Install the patch – Cut patch material 6+ inches larger than damage, apply with seam roller
- Seal edges – Apply lap sealant around patch perimeter for waterproof seal
Flat roof leaks are surprisingly common, with water damage being one of the most expensive problems homeowners face. The good news? Many flat roof membrane repairs are DIY-friendly projects that cost around $50-$100 in materials and take just 2-4 hours to complete.
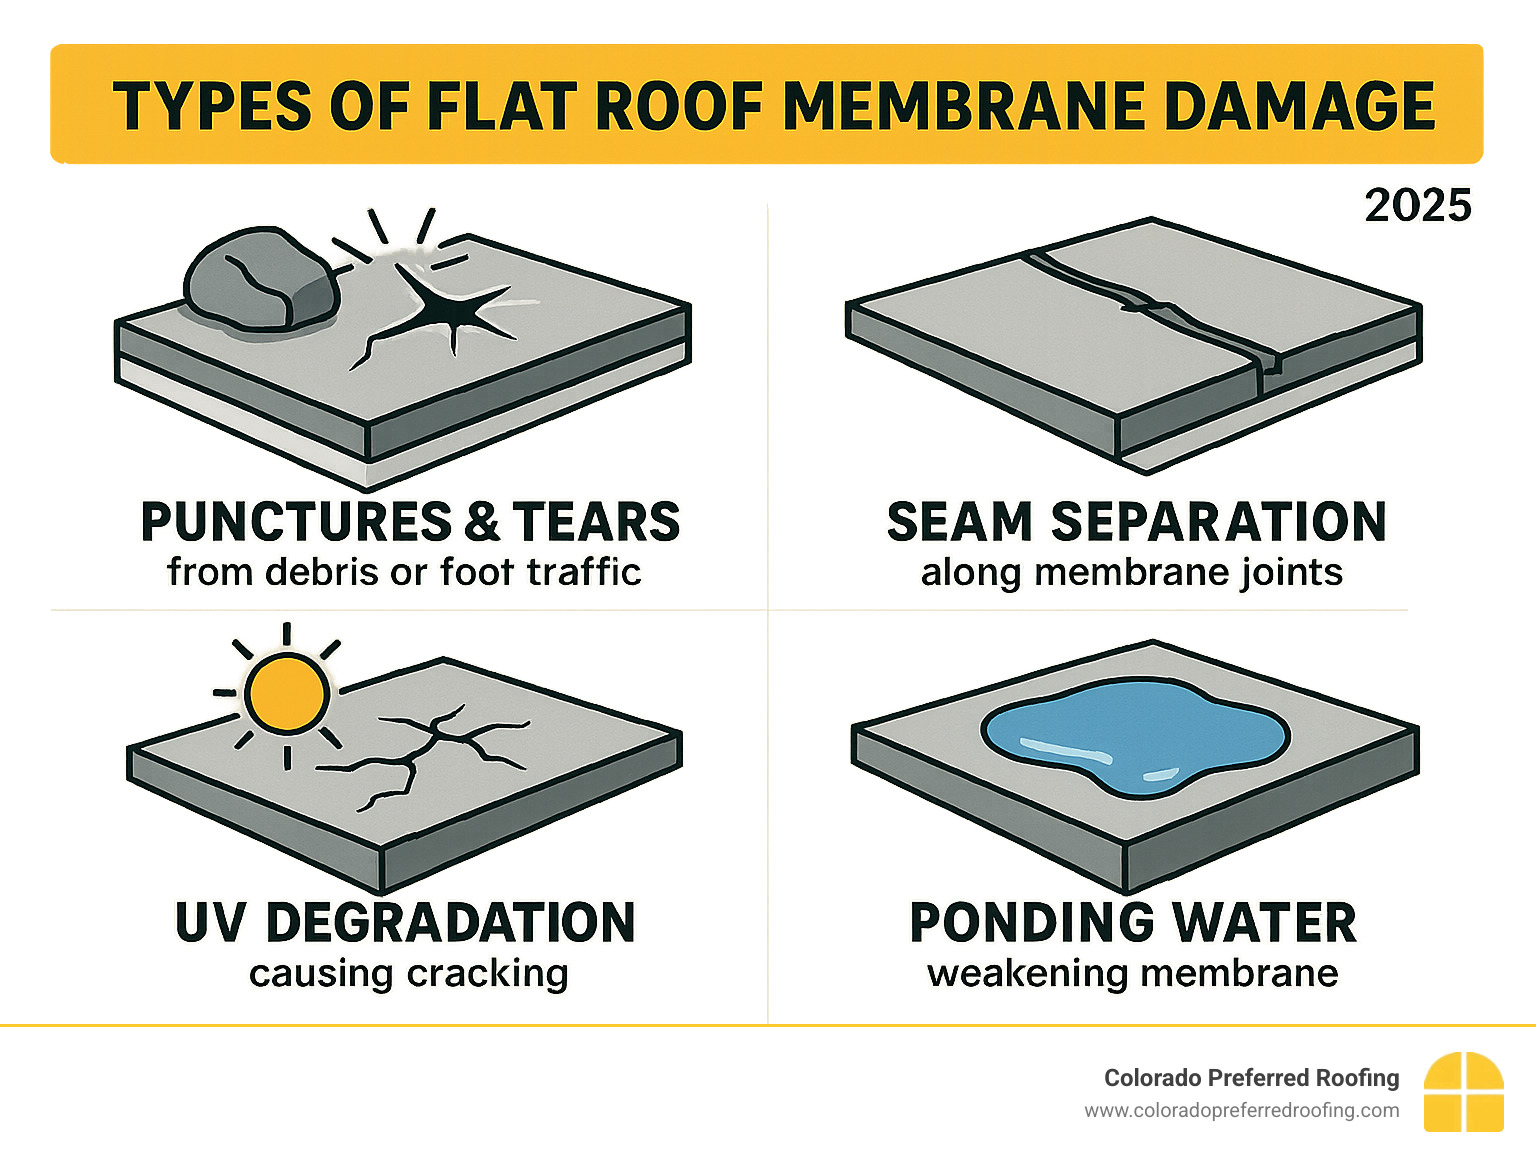
Common flat roof membrane problems include:
- Punctures from foot traffic or debris
- Seam separation due to thermal expansion
- UV degradation causing cracks and brittleness
- Ponding water that degrades the membrane over time
The key to successful repairs is understanding your membrane type (EPDM, TPO, PVC, or Modified Bitumen) and using the right materials and techniques for each.
I’m Mark Aumen, owner of Colorado Preferred Roofing with over 14 years of experience in residential and commercial roofing projects. Throughout my career managing complex roofing repairs and leading skilled roofing teams, I’ve guided countless property owners through how to repair flat roof membrane issues while ensuring compliance with industry standards and safety regulations.
First Things First: Understanding Your Roof and Finding the Leak
Before you grab your tools and start patching, let’s talk about what you’re actually working with up there. Your flat roof membrane is basically your home’s raincoat—a waterproof barrier that keeps moisture from sneaking into your building. Think of it as a protective shield stretched across your roof deck, and like any shield, it can develop weak spots over time.
The type of membrane you have makes a big difference in how to repair flat roof membrane issues. EPDM rubber membranes are the workhorses of the roofing world—these synthetic rubber sheets can last up to 30 years with proper care and are surprisingly forgiving to work with. TPO membranes are the energy-efficient option, with heat-welded seams that typically serve you well for 15-25 years. PVC membranes are the tough guys, resisting chemicals and fire while lasting 20-30+ years. Finally, Modified Bitumen is the traditional choice, reinforced with polymers and lasting 10-20 years.
Understanding what damages these membranes helps you spot problems early. Ponding water is enemy number one—any area where water sits for more than 48 hours after rain is slowly eating away at your membrane. Colorado’s intense UV rays gradually break down membrane materials, making them brittle and prone to cracking. Punctures from foot traffic, falling branches, or that satellite dish installation can create instant leak points.
Our Colorado climate brings its own challenges with hail and storm damage being particularly common. Seam separation happens when membrane joints fail due to our dramatic temperature swings—thermal expansion and contraction gradually pull seams apart. Don’t forget about flashing issues where the membrane meets walls, vents, or other roof penetrations, as these transition areas are naturally vulnerable.
The common causes of roof deterioration often work together, creating a domino effect that turns minor issues into major headaches if left unchecked.
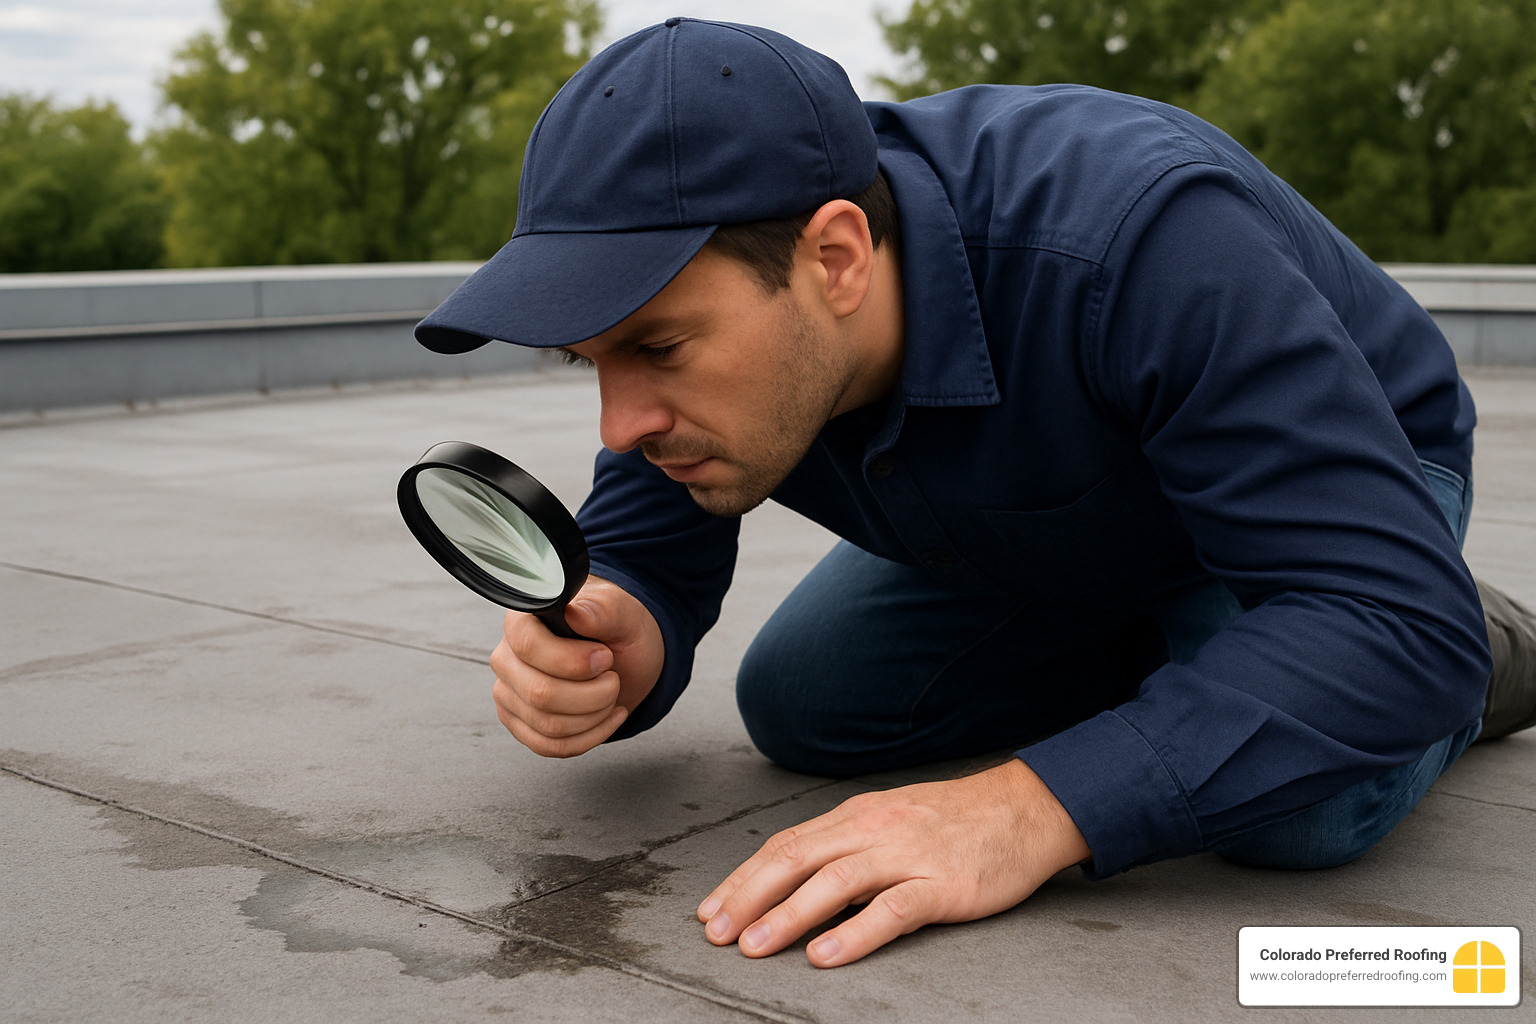
Identifying the Source of the Leak
Here’s the frustrating truth about roof leaks: finding them can be trickier than fixing them. Water is sneaky—it enters through one spot but travels through your roof system before dripping into your living space. That water stain on your ceiling might not be directly below the actual leak source.
Start your detective work inside the house. Look for water stains on ceilings and walls, check for mold or mildew growth, and feel around for damp insulation in accessible areas. Take photos and measure the stain’s location from the two nearest walls—you’ll need these measurements to find the corresponding spot on the roof.
Now head outside with your measurements in hand. Use them to locate the approximate area on the roof, but don’t expect the leak to be directly above the interior damage. If you don’t see obvious damage right away, search upslope—water always flows downhill, so the actual entry point could be several feet higher than where it’s dripping inside.
Keep your eyes peeled for telltale signs: blisters that feel soft underfoot, cracks that look like spider webs, open seams where membrane edges have pulled apart, or obvious punctures from debris. Pay extra attention to areas around drains, vents, and flashing—these are the usual suspects.
For more detailed guidance on this detective work, check out our comprehensive resource on finding leaks.
When the leak source isn’t obvious, try the water test method. Have someone stay inside while you systematically soak different sections of the roof with a garden hose. Start at the lowest point near your suspected area and work your way up until your helper spots the drip. This pinpoints the exact entry point and saves you from unnecessary repairs in the wrong spot.
Gearing Up: Essential Tools, Materials, and Safety
Here’s some encouraging news: learning how to repair flat roof membrane doesn’t require a huge investment or advanced skills. Most DIY repairs cost just $50-$100 in materials and take about 2-4 hours to complete. That’s a fraction of what you’d pay for professional service, which typically starts around $400 for residential work.
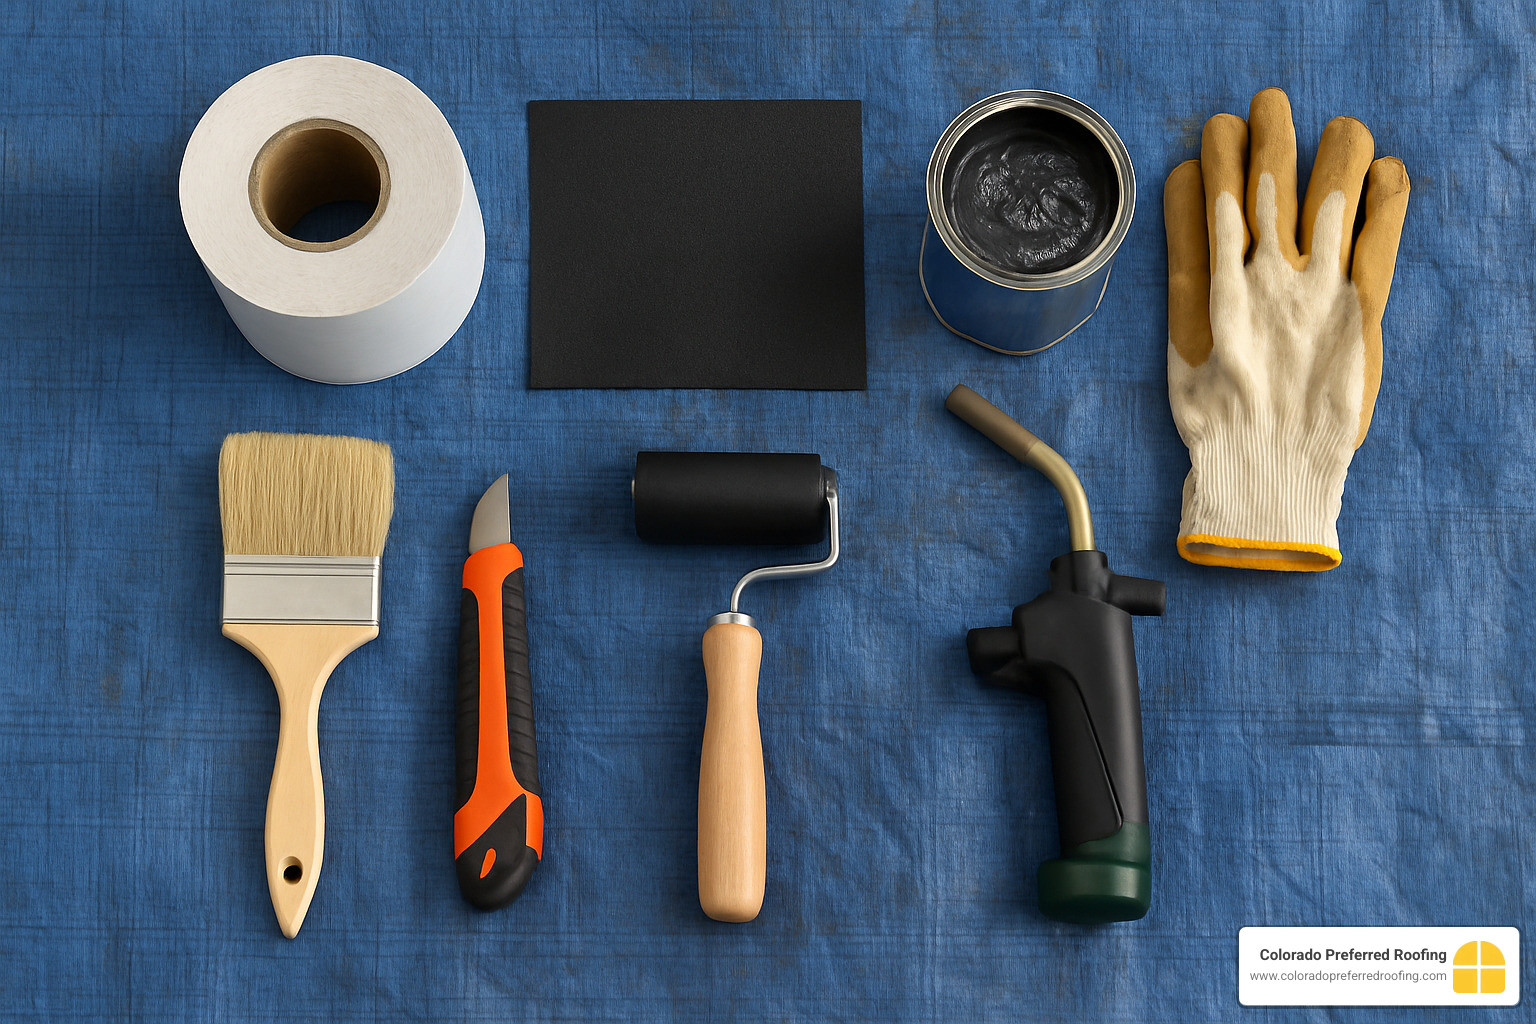
Getting the right tools makes all the difference between a frustrating experience and a successful repair. You’ll need a utility knife with sharp blades for cutting membrane material, plus a stiff-bristle brush for thorough surface cleaning. A trowel helps apply roofing cement evenly, while a caulking gun gives you precise control over sealant application.
The real game-changer is having a quality seam roller—this heavy-duty silicone roller eliminates air bubbles and ensures proper adhesion. Don’t forget a paint roller for primer application and basic measuring tools like a measuring tape and scissors for cutting patches to size.
When it comes to materials, everything depends on your specific membrane type. You’ll need membrane-specific cleaner (like EPDM cleaner for rubber roofs), primer that’s compatible with your membrane, and patch material that matches your existing roof. Quality roofing cement or contact adhesive creates the waterproof bond, while lap sealant seals the edges for long-term protection.
Pro tip: Cut your patch material about 12 inches larger than the damaged area on all sides. This generous overlap ensures a watertight seal that won’t fail during Colorado’s temperature swings.
Critical Safety Precautions
Let’s be honest—working on roofs isn’t something to take lightly. But with the right precautions, you can complete your repair safely and confidently.
Weather conditions are absolutely critical. Only work on sunny, dry days with calm winds. Wet membranes are slippery, and adhesives won’t cure properly in damp conditions. If there’s any chance of rain or strong winds, postpone your project.
Ladder safety starts before you even climb up. Make sure your ladder extends at least three feet above the roof edge, and have someone hold it steady while you climb. Better yet, consider using a fall prevention harness or fall restraint system, especially if you’re not comfortable with heights.
Once you’re on the roof, cover any skylights with plywood to prevent accidental falls through glass. Wear safety glasses to protect your eyes from debris and chemical splashes, and use nitrile gloves—not latex or vinyl, which don’t resist roofing chemicals effectively.
Non-slip footwear with good grip is essential, especially on smooth membrane surfaces. Move deliberately and stay aware of your surroundings. Never work alone—having someone on the ground provides an extra safety net in case of emergencies.
For more comprehensive safety guidance, check out our tips for emergency roof safety. No repair is worth risking your safety—if conditions don’t feel right, call a professional instead.
The Step-by-Step Guide on How to Repair Flat Roof Membrane
Ready to tackle the actual repair? This is where the rubber meets the road—literally. Learning how to repair flat roof membrane is considered a beginner-level skill, but don’t let that fool you into skipping the details. The secret to a repair that lasts for years instead of months lies in proper surface preparation and religiously following manufacturer instructions for adhesion.
Think of membrane repair like putting a bandage on a wound. You wouldn’t slap a Band-Aid on a dirty cut and expect it to heal properly, right? The same principle applies here—clean preparation is everything.
Step 1: Preparing the Damaged Area
Surface preparation is absolutely critical and honestly, it’s where most DIY repairs fail. Rushing through this step is like building a house on a shaky foundation—it might look good initially, but it won’t last.
Start by removing all debris, dirt, and loose material with a stiff brush. If you find standing water, use a wet/dry vacuum to remove it completely. Next, wash the area with warm water and mild detergent, then apply a membrane-specific cleaner—this step is essential for EPDM and other synthetic membranes because it removes oils and residues that prevent proper adhesion.
Here’s the part that tests your patience: allow the area to dry completely. I know you’re eager to get the repair done, but moisture is the enemy of membrane adhesion. In Colorado’s dry climate, this usually takes 2-4 hours, but don’t rush it.
Once dry, use a utility knife to cut away any damaged or blistered membrane sections. Scrape away old sealant or loose material until you have a smooth, clean surface. For blisters, cut an “X” shape and peel back the material to allow any trapped moisture to escape and dry out.
Step 2: How to Repair a Flat Roof Membrane by Patching Holes and Tears
For holes and tears, you’ll create a patch that extends well beyond the damaged area—think of it as giving your roof a strong, protective shield rather than just covering the hole.
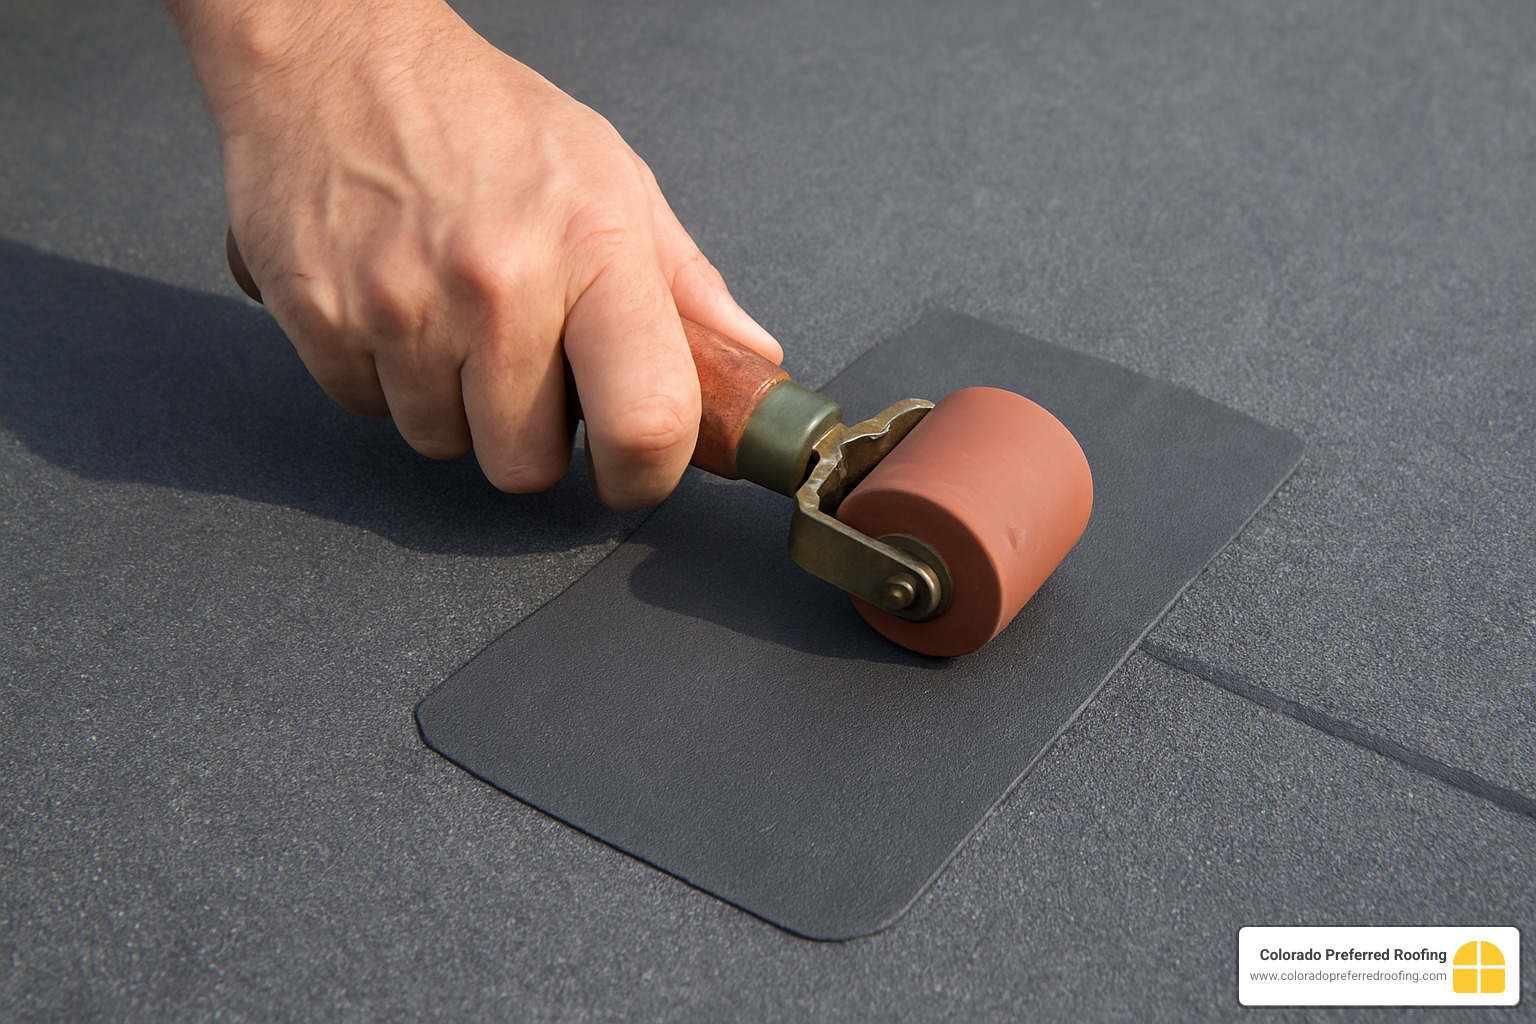
Cut your patch material at least 6 inches larger than the damage on all sides. This isn’t being wasteful; it’s ensuring your repair actually works. Here’s a pro tip that’ll save you headaches later: round off all corners. Sharp corners are stress points that love to peel up over time, especially in Colorado’s freeze-thaw cycles.
For larger holes, consider using a two-patch system: apply a smaller patch directly over the hole, then cover it with a larger patch. This creates multiple layers of protection and distributes stress more evenly.
Now comes the critical part: apply roofing cement or appropriate adhesive to both the roof surface and the patch. If you’re using contact cement, let it become tacky (about 10 minutes) before positioning—this creates a stronger bond than wet-on-wet application.
Position the patch carefully, starting from one edge and working across to avoid trapping air bubbles. Use your seam roller to firmly press the patch, working from the center outward with steady, even pressure. Pay special attention to the edges—they’re the most likely failure points.
Finish by applying a 1/4-inch bead of lap sealant around the entire patch perimeter. Smooth it with a putty knife for a professional finish, then allow proper curing time as specified by the manufacturer.
Step 3: How to Repair a Flat Roof Membrane by Fixing Separated Seams
Seam separation is incredibly common in Colorado’s climate, where extreme temperature swings cause materials to expand and contract like an accordion. The good news? It’s usually easier to fix than holes.
Start by cleaning under the separated seam thoroughly—use your brush to remove any debris or old adhesive. Apply roofing cement or appropriate adhesive under the loose membrane, then press the seam down firmly and apply weight like a board with bricks on top.
Allow the adhesive to cure according to manufacturer specifications—resist the urge to check on it every few minutes. Once cured, apply lap sealant along the seam edge for additional protection against water infiltration.
Here’s a pro tip specifically for EPDM seams: use uncured peel-and-stick flashing rather than traditional glue methods. It’s more reliable, easier to work with, and creates a stronger long-term seal.
For related repairs around roof penetrations, check out our guide on roof flashing repair.
Step 4: Addressing Wet or Damaged Substrate
Sometimes the problem goes deeper than just the membrane surface—and that’s when how to repair flat roof membrane becomes more complex. If you find soft spots or suspect substrate damage, don’t ignore it. A membrane repair over damaged substrate is like putting new paint over rotten wood.
Identify soft or spongy areas by walking the roof carefully. Cut open the membrane in affected areas to inspect underneath—you might find wet insulation that needs complete replacement. Check the roof deck for rot or structural damage while you’re at it.
If you find substrate issues, remove any wet insulation completely—it must be replaced, not dried out. Ensure the area is completely dry before proceeding, then install new substrate material if needed. Finally, patch the membrane over the repaired area using the techniques described above.
Important reality check: If you find extensive substrate damage or structural issues, this moves well beyond DIY territory. Contact a professional roofer immediately—some problems are worth the investment in expert help.
Beyond the Patch: Maintenance, Coatings, and Roof Lifespan
Here’s the truth about flat roofs: once you’ve mastered how to repair flat roof membrane issues, the real secret to success is staying ahead of problems before they start. Think of it like taking care of your car—regular oil changes prevent engine failure, and regular roof maintenance prevents expensive emergency repairs.
Proactive care isn’t just about extending your roof’s life (though it absolutely does that). It’s about protecting your investment and avoiding those 2 AM phone calls about water dripping onto your dining room table. A well-maintained flat roof can easily outlast a neglected one by 10-15 years.
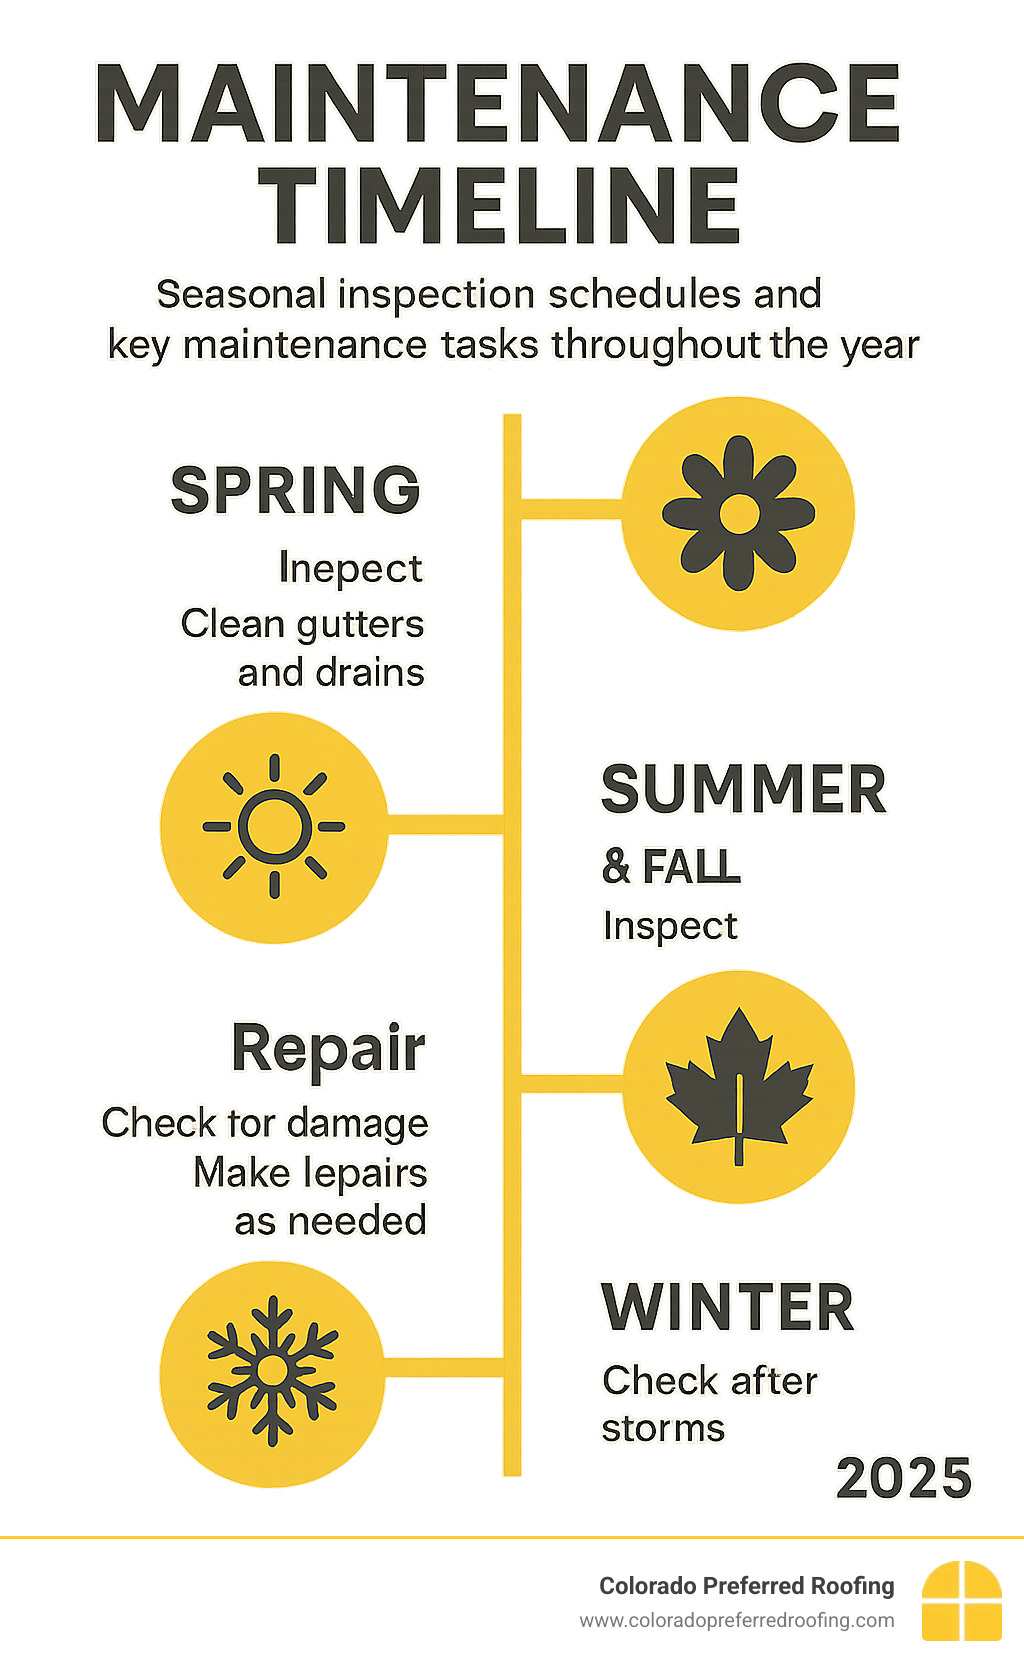
The most effective maintenance routine includes regular inspections at least twice yearly—I recommend spring and fall when you’re already thinking about seasonal home maintenance. After severe weather events, take a quick walk around your roof to check for obvious damage. Debris removal is crucial, especially in Colorado where we get everything from hail to high winds carrying tree branches.
Don’t forget about gutter cleaning and trimming overhanging branches. These simple tasks prevent water backup and physical damage that can compromise your membrane. The importance of roof maintenance becomes clear when you realize that most roof failures are preventable with consistent care.
For homeowners who prefer professional oversight, our roof maintenance services provide comprehensive seasonal inspections and preventive care custom to Colorado’s unique climate challenges.
When to Apply a Full Protective Coating
Sometimes individual patches aren’t the answer—your roof might benefit from a complete protective coating instead. This becomes the smart choice when you’re dealing with widespread minor damage across the roof surface, or when your aging membrane is still structurally sound but showing its age.
Protective coatings excel at enhancing UV protection, which is especially important here in Colorado where our intense sun can be brutal on roofing materials. They also improve energy efficiency by reflecting heat away from your building, potentially reducing your cooling costs during those hot summer months.
The beauty of coatings is their ability to seal pinhole leaks and prevent new ones from forming. Instead of playing whack-a-mole with individual repairs, you’re creating a comprehensive protective barrier. A quality coating can add 10-15 years to your roof’s life and often costs significantly less than replacement.
For detailed information about how this technology works for Colorado properties, check out our guide on roof coatings.
Repair vs. Replacement: Making the Right Call
Every roof owner eventually faces this decision, and it’s not always straightforward. Understanding your typical membrane lifespan is the starting point—EPDM can last 20-30 years with proper maintenance, while TPO typically provides 15-25 years of service, PVC offers 20-30+ years, and Modified Bitumen usually lasts 10-20 years.
The age of your roof matters, but it’s not the only factor. A 15-year-old roof with extensive damage might warrant replacement, while a 25-year-old roof with minor issues might be worth repairing. Consider the extent of damage—if you’re covering more than 25% of the roof surface with repairs, replacement often makes more financial sense.
Frequency of repairs is another telling indicator. If you’re calling for repairs more than once per year, your roof is trying to tell you something. At that point, you’re likely spending more on ongoing fixes than you’d save by delaying replacement.
The cost-benefit analysis should include not just immediate expenses, but long-term value. A new roof comes with warranty protection and decades of worry-free service, while continued repairs on an aging system offer no such guarantees.
For a comprehensive breakdown of this important decision, our guide on roof replacement vs. repair walks you through the financial and practical considerations specific to Colorado homeowners.
Frequently Asked Questions about Flat Roof Membrane Repair
What is the average lifespan of a flat roof membrane?
The lifespan of your flat roof membrane depends heavily on the material you choose and how well you maintain it. EPDM rubber roofs are the marathon runners of the roofing world, typically lasting 20-30 years with proper care. TPO membranes fall somewhere in the middle at 15-25 years, while PVC membranes can actually outlast EPDM, often reaching 20-30+ years or more.
Modified Bitumen tends to have the shortest lifespan at 10-20 years, but it’s also typically the most budget-friendly option upfront. Here’s the thing though—these are just averages. I’ve seen well-maintained EPDM roofs in Colorado that are pushing 35 years and still going strong.
The real key is proper maintenance. A roof that gets regular inspections, prompt repairs, and good drainage maintenance can easily exceed these expectations. On the flip side, a neglected roof might fail well before its expected lifespan. Colorado’s intense UV exposure and temperature swings mean maintenance is even more critical here than in other climates.
Can I repair my flat roof in any weather?
Here’s where I have to be the bearer of bad news—absolutely not. Weather conditions can make or break your repair job, literally. You need sunny, dry weather with calm winds and mild temperatures for any how to repair flat roof membrane project to succeed.
Think of it this way: adhesives and sealants are like finicky houseguests—they need everything to be just right to perform properly. Most roofing materials won’t bond correctly in temperatures below 40°F, and high humidity can prevent proper curing. Rain or snow are obvious no-gos, but even morning dew can ruin your repair efforts.
Wind is another enemy you might not consider. It can blow debris onto your wet adhesive, make it difficult to position patches accurately, and create safety hazards. I always tell homeowners to check the weather forecast for at least 24 hours after their planned repair—you need that time for materials to cure properly.
If you’re dealing with an emergency leak during bad weather, focus on temporary measures like tarps or emergency sealants, then plan your proper repair for better conditions.
How much does a DIY flat roof membrane repair cost?
This is where DIY repairs really shine in terms of savings. Minor repairs typically cost just $50-$100 in materials for most homeowners tackling the project themselves. This covers your patch material, primer, sealants, and any basic tools you might need to purchase.
Compare that to professional repairs, which start around $400 for residential work and can easily reach $500-$800 for more complex jobs. Commercial repairs typically start at $750 and average around $1,200 due to the larger scale and additional safety requirements.
The math is pretty compelling—DIY repairs can save you $300-$700 per repair. Over the life of your roof, that’s potentially thousands of dollars in savings. Of course, this assumes you’re comfortable working on your roof and the damage is within the scope of DIY repairs.
For more detailed cost breakdowns and to understand when professional help makes more sense, check our roof leak repair cost estimates. Sometimes the peace of mind and warranty that comes with professional work is worth the extra investment, especially for larger or more complex repairs.
Conclusion: Protecting Your Property from the Top Down
Mastering how to repair flat roof membrane puts you in control of your property’s protection. You’ve learned the essential steps—finding the leak source, preparing surfaces properly, applying the right primer, installing patches with professional technique, and creating watertight seals around edges. These skills can save you hundreds of dollars and prevent small problems from becoming major disasters.
The most important takeaway? Surface preparation makes or breaks your repair. A clean, dry, properly prepared surface with the right primer will hold for years, while rushing this step leads to failure within months. Always use membrane-specific materials and follow manufacturer instructions to the letter—these aren’t suggestions, they’re requirements for success.
Safety should never be compromised for speed or convenience. Working on roofs involves real risks, and no repair is worth an injury. When weather conditions aren’t ideal or you feel uncomfortable with the work, wait for better conditions or call professionals.
Regular maintenance truly is your best investment. Those twice-yearly inspections, prompt debris removal, and quick attention to minor issues can double your roof’s lifespan. Think of it as preventive medicine for your building—much cheaper than emergency surgery later.
But let’s be honest about limitations. Know when to call professionals for complex issues like extensive substrate damage, structural problems, or full roof replacements. These situations require specialized expertise, proper equipment, and often building permits.
At Colorado Preferred Roofing, we’re here when DIY repairs aren’t enough. Our team combines best customer service with expertise in insurance claims and membership in the Colorado Roofing Association. We bring professional-grade solutions to complex roofing challenges across the Front Range.
Whether you’re in Aurora, Denver, Colorado Springs, Fort Collins, or anywhere across Colorado, we understand the unique challenges our climate presents. From hail damage to UV degradation, we’ve seen it all and know how to fix it right the first time.
For complex repairs or commercial flat roof services, we’re ready to help protect your property investment.
Your roof is your building’s first line of defense against Colorado’s weather extremes. Whether you tackle repairs yourself or trust them to professionals, make sure your roof gets the care and attention it deserves. After all, everything you value sits beneath that membrane.